Showing posts with label gardening. Show all posts

Self-watering Herb Spiral – An Idea Worth Sharing

A herb spiral is a great idea to grow herbs on a mound of dirt. However, in hot and dry weather with extra radiant heat from stones even herbs struggle to survive. To keep them alive a regular watering and a fair a bit of water is required. For that reason a self-watering way sounds like the way to go. But how to make it work in a spiral with steeping soil for herbs to grow? Being an engineer I came up with a very clever but simple design idea which should work marvellously. So here is a description how we designed and built our herb spiral.

The spiral has three water reservoir levels as shown on the schematic. Each level comprises of the following layers (described from bottom to top).
  • Softening layer (carpet) to smooth ground surface to protect black plastic
  • Concrete underlay (black plastic 0.2mm thickness)
  • Protective layer (carpet) to avoid punching holes in plastic
  • Ag pipe across an entire reservoir and bended upwards to supply and spread water
  • Water holding medium (stones)
  • Soil around perimeter and in fill soil in the middle
  • Stone to build outside wall
The pictures show step by step how we built each water level. The plastic underlay is as high as the stone water storage so the excess can overflow. From the top level it overflows into a middle level, from there to the bottom level which then overflows into the ground underneath. Each level watering pipe has got a float (a wooden skewer in a styrofoam rounded piece) to indicate the water level.

At the bottom the soil is about 10cm deep. When it curves around the spiral the soil depth increases to about 40cm. That’s where the next level starts with 10cm deep soil again. So in that way we achieved continuously raising soil without any interruption.

Our self-watering herb spiral is about 2.5 metres in diameter and 1 metre high. We planted over 20 different herbs around it according to their needs (e.g. mint in shallow soil thus more moist facing east; oregano in deep – less moist soil facing north).

We (two people) built the entire herb spiral project in just over one day with mostly freely available material on our property. It cost us a couple of dollars for the black plastic underlay. We located it in our newly built kitchen garden less than 10 metres from our kitchen. It’s already been well used for every day cooking.

There are more bright ideas to come and share from our Spurtopia Homestead, so watch the space.


ABC Radio Interview: Sustainable garden as a weapon in war on waste


We were privileged to do an ABC Radio interview with Terri Begley on how sustainable garden can reduce waste.

Listen to the interview ABC interview - Sustainable garden

Spurtopia progress

Landscaping taking shape
In the last half a year we have been very busy establishing our Spurtopia Homestead. It is ever so exciting especially when you do something you are absolutely passionate about - materializing our vision and creating a beautiful reality and future for our family.

It has taken a lot of planning, sketching and thinking to get it right and make it work. So far we have:
  • Installed solar power on the roof (6kW system);
  • Solar hot water system ($700);
  • Self-watering planter boxes to quickly start growing our food;
  • Established several garden beds;
  • Planted 25 native trees;
  • Landscaping – created a stone retaining wall and levelled a part of land close to the house, prepared a pad for a shed, built swales on contours (about 500 metres) for an orchard and food forest;
  • Set up rainwater harvesting – 5000L (five IBC tanks) for a garden irrigation and we are in the process of installing 50Kl of rain water tanks for home use;
  • Three free range chickens, 3 beehives as well as 2 worm farms are our day-to day companions;
  • 8 large compost bays for preparation of nutrient rich soil;
  • House face-lift such as decoration, renovation of a bathroom, laying tiles etc.
We have used a huge amount of materials to improve our unfertile and very poor soil:
Capsicons in Self-watering boxes

  • 6 truck-loads of crusher dust and decomposed granite – minerals for garden and fruit trees;
  • 2 truck-loads of wood chips, four truck-loads of soil;
  • 70 cubic metres of horse manure;
  • three ute loads of cow manure;
  • and grass clippings and palm leaves from local garden maintenance guys.

As a result we already have an abundance of greens, tomatoes, zucchinis, eggplants, squashes, sweet corn, capsicums and rosellas. In our opinion these are very good results considering such a hot and dry summer (while writing these lines the thermometer shows 42°C in the shade!)

Our home production is in a full swing, making yoghurt, kefir, kombucha, sauerkraut, kimchi, sourdough bread, raw cakes, home brew beer, ginger beer, lemonade and absolutely delicious mead from our honey.

On a day to day basis we do natural parenting and home education of our two daughters which gives us a joy and meaning of life.
Vegi garden


Also establishing a local community in our neighbourhood is essential for us so we share our experience and produce which is starting some very nice relationships.

We already have a lot of people coming to see how we have been transforming our one acre property into a sustainable paradise. This year we are planning to have our place open to the public for visits, education, workshops and internship programs. We do what we are passionate about, we live our dream and in that way we’re creating our reality and shaping our future in which we want to live. 2017 will be another amazing year, full of joy, prosperity and happiness.


Your Spurtopians

The Spurtopia Cottage

We had to move out of our rented place in inner city Brisbane. Our very good friends who are like our “Australian parents”, offered us the opportunity to live temporarily with them on an acreage close to Jimboomba until we find a new home to buy.
So “the deal” is we can live in a shed for free in exchange for some help on their property. This, to us, sounds like a pretty good deal, doesn’t it? There are so many people who own a property with a lot of space but do not have the time or strength to look after it, while there are many people who are young, willing to work and have time in their hands. So combined together it is a win - win situation and everyone benefits.
Our intention is to prove the case and show it is possible to achieve, also that converting a shed into a liveable shed does not need to be expensive. The existing shed (6m x 6m) comprises of concrete floor, three windows, an entrance door and a roller door. It is connected to the electricity supply and a rainwater tank with a water outlet on a corner of the shed.
The majority of the materials we used for the conversion are reused, recycled, donated or unwanted items such as:


  •  Kitchenette comprising of a bench, a sink, tap ware and cupboards is a “throw away” from a private hospital
  • Large (2.1m x 2.4m) glazed sliding doors with a crim-safe screen and a kitchen oven from a kerbside collection
  • Wall and roof insulation from the manufacturer off cuts (30cm wide off cut rolls 24m long) about 120 square metres.
  • Camping compostable toilet and gas cooker are donated by our friends
  • Brand new hand basin, tap ware and laminated floor as leftovers from a construction site
  • Plywood wall boards and flyscreens are reused
  • Shower cubical in exchange for a couple of jars of our honey
  • Wooden stove in exchange for three bottles of our home brew mead
  • Recycled garden and swimming pool hose
  • Some minor materials used from the property


So all we had to buy were a few metres of pine studs, plaster board, reflective foil, a sliding door rail, a tiny instantaneous hot water heater and some screws.

First, we insulated the walls with 6cm of thermal insulation and lined with plywood. The kitchen was reassembled and cupboards used as an L - shaped partition to create the bathroom. There are pine studs, a ceiling grill was fitted with two layers of thermal insulations and a reflective foil then lined with plaster boards to create a flat insulated ceiling. The existing roller door was dismantled and replaced with sliding doors which provide a great view at greenery and connectivity with nature. Finally, the plumbing of the existing water supply outlet at the corner of the shed is connected to our shower, kitchen sink, washing machine and an instantaneous hot water heater via a recycled garden hose. Drainage of these outlets is done by reused swimming pool hose.

So now our “Cottage” is spacious open plan space with plenty of daylight, functional, fully liveable, and sustainable, using a minimum amount of rain water and electricity. We collect grey water to irrigate the garden and using the compostable toilet (without chemicals) to fertilize the soil before planting trees.

We look after the existing veggie garden comprising of two shade houses, which produce herbs, greens and veggies which we share with our friends who live here. The existing fruit trees bear a lot of fruit. Our compost heap, which we moved from the old place, became a productive food source with self-seeded tomatoes, thorny cucumbers and other volunteer plants. Lately we built three water efficient, self-watering bath tubs and styro-boxes to extend our growing space. We are also, looking after 7 chickens, of which 3 girls moved with us, laying an abundance of fresh eggs. We keep our bees in our friend’s place in Mitchelton as they are more productive in the city, just recently we harvested over 100kg of honey from two beehives.

The entire conversion of a workshop shed into a “cottage” was done within a couple of months while living there. It cost us less than $600. Our ongoing expense is less than $1 per day for electricity and internet access.

This is a prime example of sustainable existence, where we help each other. It costs nothing extra and there is no need to waste resources, money, time and effort to sustain a family while living a wholesome, frugal and fulfilling life.

Your Spurtopians

Self-watering Bathtub - Easy to Make, Easy to Grow Food


Self-watering bathtub 
When I found a bathtub on the side of a road, a bright idea came to me - it could be a great self-watering garden bed! The challenge would be to create a raised floor for holding soil above and storing water below while allowing water transfer between the water storage and the soil. I have come across a lot of different bathtub designs using woodchips, gravel or sand for water storage but they significantly reducing water holding capacity and at the same time are bulky and fairly heavy. So I came up with a design using a few recycled materials to create a self-watering bathtub with a massive water storage capacity of  about 100litres.

The self-watering bathtub has turned out to be very successful for growing our vegetables specifically water loving plants such as cucumbers and melons. The massive water holding capacity provides a constant supply of moisture to plants (via a wicking effect) with no need for watering for several weeks even months. It makes growing vegetables easy and bulletproof. More importantly, the self-watering bath tub is easy to make from materials readily available.


Materials needed:
  • a recycled bath tub,
  • three bricks
  • a piece of steel mesh/old rigid fence
  • a couple of hessian bags/ old towels
  • a piece of PVC pipe about 60 cm long


Step by step to make a self watering bath tub:
Raised floor - Steel mesh on bricks 
1. Seal the bath drain with a plug.
2. Place three bricks on their edge into the bathtub (one at each end and the other in the middle of the tub).
3. Cut the steel mesh (a concrete reinforcing mesh or an old fence panel) to fit into the bathtub and rest it on the bricks creating a raised floor.
4. Use hessian bags/old towels to cover the steel mesh with hessian ends reaching down, into the bottom of the bathtub. The hessian will hold the soil and provide wicking from the ends. (You can add a shade cloth under hessian bad which holds soil better and last longer.)
5. Drill a overflow hole into a side of the bathtub level with the raised floor.
6. Cut a piece of pipe (about 60cm long) and stand it so it runs from bottom to the top of the bathtub, to be used to fill the lower area with water.
7. Fill the bathtub with rich organic soil.
8. Plant seeds or seedlings.
Hessian bags on mesh with ends in water
9. Mulch it!
10. Water it well from the top and fill up water storage.
11. Make a float (a piece of styrofoam and a wooden skewer) of a smaller diameter but the same length as the pipe and place it into the watering pipe to indicate water level.


An alternative way of making the self-watering bathtub is by using plastic crates or a wooden pallet.
Cut a PVC pipe of the same length as a crate/pallet height . Glue (adhesive sealant) the pipe into the drain hole at the bottom of the tub with the top of the pipe sticking out into bathtub (about level with the top of the crate/pallet. Make sure it is properly sealed, so water is held in the bathtub up to the top (about 20cm) of the PVC pipe. (If there is more water in water storage it overflows through the top of the pipe and get out the bathtub drain.) Then place plastic crates up-side down to create huge pockets for water storage. Note you can use anything which would create raised floor (eg. wooden pallet). Cut a watering-in PVC pipe so it comes from bottom to above the top of tub and secure it in a corner of the bathtub. Cover crates with shade cloth which goes up and down on the perimeter of the bathtub and between crates creating pockets. Fill pockets up with soil which will become a wick. Fill the entire tub with rich organic soil.

Mulch it on the top to stop any surface moisture evaporation and plant seeds or seedlings. Water it from top for a week or two so soil will settle down and an effective wicking effect is established. Place a bit of styrofoam float with wooden skewer into the watering pipe and fill it in with water until it's full and starts to flow from the bottom.


The trick of growing healthy plants is to keep them stress free. If they have enough nutrition, the right soil temperature (not too hot) and a constant supply of moisture especially on hot summer days, they will thrive. This can be easily achieved with the self-watering bathtub. Nutrition after heavy rain can be recovered from the water storage which also keeps soil cool, via an evaporation effect - without loosing water. The constant on demand, water supply via a wicking effect make plants happy even during hot summer days.

The self-watering bathtub is great to use everywhere: at gardens with bad soil or trees roots sucking all nutrition, concrete yards, balconies etc. We found them great for growing our food as they really, really work.

Happy gardening

Living a Simple, Happy and Healthy Life - Article

YOUR VEGIE PATCH magazine in January 2016 issue published an article about our lifestyle. Thank you Tess Holderness for writing such an inspirational story about us and getting our message across.

A worm farm - The vitamin for your garden

A worm farm
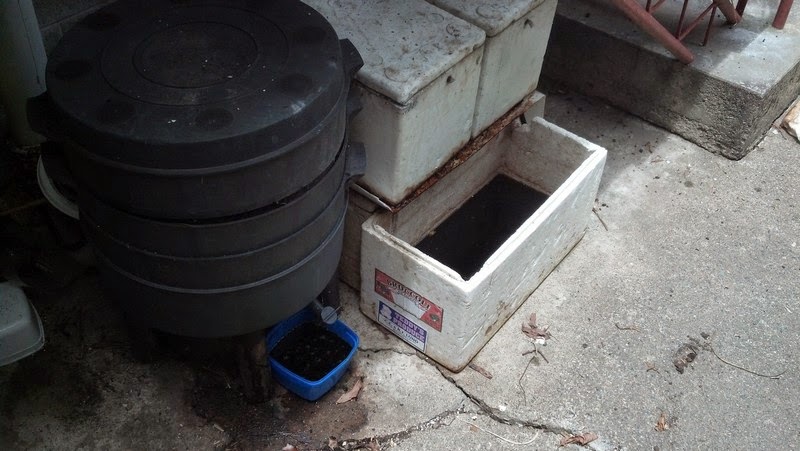
Would you like to convert your fruit and vegetable scraps into rich soil and brilliant organic fertilizer (worm castings) for plants as well as being environmentally friendly? If so, start a worm farm. We have three and they produce surplus of it. Most people would go and buy a black plastic worm farm and worms from a shop but you do not need to do that. We used a styrofoam (broccoli box) with a handful of worms from our friend’s worm farm. We are not only recycling a box (from a local fruit and veggie shop) which would otherwise go to landfill but also it’s all free.

How to make and start a worm farm:
- Get a styrofoam box with a lid and make a hole (with a pencil) in a bottom corner for draining of worm juice and two opposite holes at the upper part of the box for ventilation.
- Place the box on a stand so you can harvest worm juice into a pot under the drain hole.
- To start the worm farm, we put well wetted organic material (shredded cardboard newspaper, leaves or coconut husk (coir) plus a few kitchen scraps and the worms into the box.


Worm farming tips:
Our three worm farms

- Worms do not have teeth so they cannot bite chunky food. They wait until their food is partially decomposed.To speed up the process put kitchen scraps into a food processor and make a mash or place them into a plastic bag in the freezer – as they defrost, they go slimy – it’s ready for the worms to eat.
- Do not over feed worms. Give them food approximately every one to two weeks when they have nearly finished their previous food. If there is too much food, a composting process starts generating heat which might overheat the worms.
- Regularly add shredded newspaper, cardboard or leaves to keep a balance of organic nutrition (kitchen scraps) and carbon (cardboard etc).
Worms - hard workers

- You can add occasionally a bit of diatomaceous earth or fine sand or to help the worms’ digestive system.
- To harvest worm juice (plant fertilizer) water the worm farm with about 5 litres of water once or twice a fortnight or as needed.
- Worms like a dark and moist environment so put a hessian (potato) bag over them. After a while the hessian will also decompose.
- The number of worms depends on the amount of food available. When food is plentiful worms will reproduce rapidly, with little food, numbers will drop.
- Keep your worm farm in a shaded spot so the sun does not overheat it in summer.
- We found a styrofoam box worm farm works better than a black plastic one as styrofoam insulates; keeps worms warm in winter and cool in summer times.
Worm Juice - gold garden fertilizer

- Sometimes maggots appear in a worm farm. There is nothing wrong with that. They help with converting organic materials into rich soil.
- If a lot of worms are on the inside of the lid, it’s a sign of overfeeding or their environment has become acidic. Stop feeding them for a week or so and sprinkle a bit of dolomite on the top.
- If you want to harvest rich soil from a worm farm always take it from the bottom where there’s the most manure. To find any worms which are left in the soil, put it in a pile in the daylight /sun. Worms do not like light and will move towards the centre of the pile. A bit at a time, remove the outside layer of the soil pile. You will be left with mostly worms in the last bit of soil which can go back into the worm farm.
- Food which worms like: fruit and veggie scraps, tea bags and coffee grounds (they absolutely love them) cow, horse, sheep manures, mushroom compost etc. Avoid garlic, onions and citrus peels, meat and bread.
- The bigger the variety of foods you put into your worm farm, the richer the fertilizer and soil you get out of it!
- Worm farm worms are different from those in the ground. They are very efficient at converting their food into worm casting and they would not survive in the ground.

Hope this information helps to start a worm farm. Check our Easy to make worm farm video. We also run hands-on Worm Farming workshops, so you can make your very own worm farm. For more details and dates check our Events and Workshops.

Happy Worm Farming

Nature Is Our Teacher


How the garden used to look like....
Brisbane has experienced an extremely long dry winter and spring period when everything became very dry and the lawns, crispy. However our garden, with a lot of tender love and care, looked like lush green jungle as we kept watering with collected rainwater. Everyone was hoping for rain for so long and it came eventually in the form of a massive, unusual storm (cyclone 2 type) combined with a huge amount of rain, strong wind and hail.

Brisbane mega storm 27 Nov 2014

As a result, not only were the windows of our house broken and the façade dotted by the hail but the garden was completely hammered. The entire garden bed was flattened as nothing could withstand hail the size of golf balls. Paw Paw trees were completely stripped of leaves and most of our mangos and avocados ended up on the ground. 

....after the storm 

For some it could have meant the end of gardening (after drought and hail) but to us it is a very encouraging and powerful message. These unpredictable and severe weather patterns are Nature's direct reflection of what is happening with human society. 

So we will start our garden beds from scratch and within 4 weeks we will start enjoying quick growing vegies like red radish and lettuce again. Nature is very resilient and powerful and everything eventually regrows.

More importantly it assures us that our 'Spurtopian way' of living provides great resilient, gives us strength to carry on living sustainably, walking lightly on the planet and encourages us to spread our message among people.

Nature is our Great teacher!


New growth appearing on pumpkin vine

Last surviving paw paws still hanging on a tree

It did not take long to see new live in the garden


Wicking Pot - easy and quick to make


People are talking about up-cycling materials but what can we really up-cycle quickly and have a long lasting benefit? We make wicking pots from a plastic milk container to grow seedlings, herbs and strawberries. You can make and plant such a wicking pot in less than 1 minute. The pot provides a plant with a continuous supply of moisture via a wick which transfers water from water storage to the soil, on demand. You do not need to water it every day as it will last for several days/weeks.
How to make the wicking pot?

Materials you need:
- 2 or 3 litre milk container (or any available plastic bottle)
- piece of "Chucks" cloth.

Cut a milk container in half with scissors. Cut a piece of "Chucks" about 10x5cm. Punch a hole in the lid and push the "Chucks" half way through with a pair of scissors. Make sure that the "Chucks" is fairly tight in the hole otherwise water will leak through and flood the soil.

Plant seeds, seedlings, herbs, greens, strawberries and they will thrive as a continuous supply of moisture reduces plant stress during hot summer days.


Did you know: To stop evaporation,  use vermiculite on the top of the pot. It's light so seeds can grow through. As vermiculite is also light in colour, it reflects sunshine and keeps the soil surface cool. It also holds a lot of moisture, about 7 times of its weight.

10 Tips for Beginner Gardeners

Lada - Beginner Gardener
Many people want to start a garden to grow organic and fresh produce but do not know where to begin. What, where, when to plant, what soil to use are common questions that need to be answered. 
Like everyone else, we (SpurTopians) had to start/learn from scratch when we arrived in Australia six years ago, as climatic conditions and the way of growing fruit and vegetables is different from Europe. Now, in our small backyard we grow over 100 types of vegies, 25 different herbs and 25 varieties of fruit trees (see a list of garden plants),  providing us with 50-75% of our fruit and vegie needs. Any excess we share with other tenants and neighbours. On average we spend just one hour a day in the garden, so it is not really time consuming. In fact, gardening provides us with great physical and mental exercise as well as  a connection with nature.

Here are "Ten Tips for Beginner Gardeners" which, from our experience, were most important when we started gardening.

Tips for Beginner Gardeners
  1. Start small and simple. (even if it's just a self-watering planter box with a few herbs and lettuces)
  2. Plant 'easy to grow' things. (eg. cherry tomatoes, radish, lettuces)
  3. Grow plants appropriate to a season. (eg. don’t plant snow peas in summer, use a planting calendar)
  4. Buy a good basic gardening book. (eg. “Organic Vegetable Gardening” by Annette McFarlane or "Planting Guide", a brochure published by  BOGI - Brisbane Organic Growers Incorporated)
  5. Join a local garden club and/or enlist the help of an experienced gardener. (eg. BOGI - there is a wealth of gardening knowledge and heaps of friendly gardeners)
  6. Position your vegetable garden where it will get sufficient sunshine (most plants like at least 6 hours of sunshine a day)
  7. Source good organic soil to get started. (Hardware stores for a few bags, landscape suppliers for larger quantities or make your own soil)
  8. Use mulch to retain moisture - exposed soil gets so hot that you can not stand on it with bare feet.
  9. Take care with watering -  Better to do a deep (longer) watering as opposed to a shallow (short) sprinkle. Preferably use rain water. Overwatering can do as much harm as not watering.
  10. Remember to feed your plants regularly with an organic fertilizer (seaweed, worm juice, or compost and chicken litter)  
Garden produce is so fresh, healthy and yummy

  • Don't be discouraged by first failures, seek advice/help and start again. It's worth it.
  • Don't get bogged down by too much detail, (eg. ph of soil, varieties of readily available fertilizer or what to put into compost etc) deal with details later when you are more experienced.
  • Don't make excuses and start - it's worthwhile and you will be rewarded with organic, fresh and healthy food.

We run Workshops - "How to Start Gardening" for people who are keen to learn how to begin. So come along for our next available workshop to learn and see first hand how to start a garden and how we grow an abundance of garden produce.

Happy Gardening

Our Garden Produce

Stinging Nettle - Spring Detox

Stinging nettle growing through a styrofoam box
Stinging nettle is considered by many as a weed in gardens. For us, it is a most valuable plant. We grow it, eat it and  use it for medicinal, gardening and other purposes. Especially, in spring, young shoots are full of vital energy and natural goodness readily available to us. So why not use it?
Growing nettle in containers keeps it enclosed. It's so vigorous it will grow through a styrofoam box. It is easy to propagate from seeds or runners.
We drink nettle tea in spring. It is a powerful immune system booster washing away toxins and purifying the system - a spring detox for our body to recover after winter.
Summer tea: stinging nettle, mint and honey. When served chilled, it is a most refreshing drink.
Other uses for stinging nettle:

Medicinal:
Richest edible plant source of iron and chlorophyll.
Rich source of vitamins & minerals.
Nettle tea - Spring Detox
Stimulates circulation.
One of the best blood cleansing and blood building herbs known.
Serotonin in nettle can be a benefit to many people who suffer depression.
A rich source of antioxidants.
Leaves used to make nettle shampoo.
Leaves used to make nettle footbath.
Root used to make nettle tincture.

Culinary:
Smoothie (when processed in blender  it does not sting)
Cooked like spinach and used in soup

Animals:
Good for most animals (if dried). Improves egg production in chickens if mixed with their grain.
Nettle rinse for flea control for dogs.
Garden:
Nettle tea fertilizer - full of nitrogen
Nettle plant tonic. (helps build resistance to heat stress)
Nettle spray – for aphid control.

.....and the list is endless....

Did you know when you are stung by a nettle it reduces the risk of developing rheumatism. Also it is supposedly used as a pain killer.

SpurTopia - A Small Kingdom of Happiness

SpurTopians
My family and I have been living in a rental property in Brisbane for over five years. We have adopted a sustainable lifestyle becoming less reliant on the system and more self-sufficient.
We created a “farm” that produces vegies, fruit, honey and eggs in abundance. Most of our fruit and vegies come from our garden. Excess is shared and swapped within a functional community of neighbours.
We grow organically over 100 different types of vegetables, 25 herbs and 25 fruit trees utilizing every available space (yard space, block walls, fences, staircase) of a typical urban block.
We continuously improve effectiveness with our new ideas and inventions e.g. vegetable pyramid, self-watering/fertilizing planter boxes, worm farm planter pots, gravity fed irrigation, chicken feeders, maggot tin grower - all made from recycled materials.
Our “farm” is productive, efficient and visually pleasing. It includes:
  • Chickens, honeybees, worm farms 
  • Rain and grey water harvesting, home-made solar hot water system
  • Preparing organic rich soil and fertilizers, seedlings, seed saving, multi-purpose bamboo pyramid
  • A bath tub with fish and water vegetables
  • A cob and solar oven
  • Use of locally available resources
  • Sprouting, fermenting, preserving, cooking from garden produce
The low maintenance urban “farm” (under 1hour a day) provides us with fresh organic food, fun, physical and mental exercise and a connection with nature. Gardening is extremely rewarding making life simpler, cheaper, healthier and more sustainable – it is another dimension to life.

We set an example of what can be achieved in a rental property, passionately sharing our experience, knowledge, ideas and inventions with the general public via TV, radio, newspapers, public events and workshops .

We have created the notion of “SpurTopia”, a small kingdom where we are living a fulfilling and happy life.


Beekeeping - How we started


A honey bee on basil flower
We started beekeeping a couple years ago. At that time we had no idea what keeping bees was about. Loving honey and wanting pollination for our garden was a driving force. We read a book (The Bee Book – beekeeping in Australia, by P. Warhurst) and visited a local beekeeping club to find out more. We also asked all of our neighbors if they were happy for us to have bees in our back yard. When we had gained sufficient initial knowledge and ‘yes’ from our neighbours, we looked at local council requirements (up to two beehives in a suburban backyard) and registration requirements of the DPI. (annual fee of about $15, which was not a problem at all) We got a nucleus hive (four frames of honey bees with a queen for $70) from a local beekeeper at a beekeeping club. That autumn day we brought bees into our backyard gave us great joy and excitement. After a few days of familiarization with their new environment, we transferred the frames from the nucleus box into the bottom beehive box. The bees established themselves well over winter time and were at full strength in spring time when we added an extra box for storing honey (super). These two boxes are separated with a queen excluder (a wired frame) which keeps the queen in the bottom box while allowing bees to get through to the upper boxes to store honey. It has been great fun watching them flying out and bringing back different coloured pollen on their legs. Watching young bees hovering in front of the hive learning to fly and recognizing the area, is on schedule daily at about 2pm (you can set a watch by them).

Nucleus (4 frames of bees and a young queen) 
Managing the hive is not difficult. We got second hand equipment from friendly beekeepers so the only things we bought were the nucleus hive, veil and gloves. It cost us around $100 to start. In spring they became very busy with making honey. We added an extra two boxes (supers) for storing honey on top of the bottom (brood) box. In fact from spring till late summer we harvested honey six times and managed to get an unbelievable 160kg of honey from one hive. To extract honey we borrowed extraction equipment for free from our beekeeping club of which we have become members or through our beekeeper friends. It was incredibly joyous to extract and taste our first batch of honey. The honey is real raw honey, incredibly tasty, thick and delicious as it comes from huge variety of flowers in suburbia. Once you try "proper" raw honey you would not buy honey from a shop.

Tips:
  • Honey from a shop has most likely been thermally treated to make the honey flow during processing and this also kills all the good enzymes. It is also treated to stop crystallization which is a natural reaction of honey to cold, and has additives put into it.
  • When using honey to sweeten tea or coffee put it into a cup just before you drink it. That way, it is not super-hot and does not burn live enzymes in the honey.
  • Using second hand equipment, making your boxes and frames and borrowing extraction equipment will keep the initial cost of beekeeping to approx $100-$200. (Compared to about $1500 for a full band new set up.)  


Bees are establishing in a brood box
Bees provide us with:
Pollination for our back yard garden and also the entire neighbourhood.
Honey as a replacement for sugar.
Pollen - a great source of protein, minerals and trace elements. It is five times more concentrated protein than beef.
Propolis which is great as a disinfectant and for tooth and gum issues.
Wax for candles and polishing paint.


A bee hive is the most efficient system in the garden. Bees are so hard working and such well organized creatures – if only human beings could be like that.


Did you know that the queen can lay up to 2000 eggs a day which is more than her body weight. When bees collectively decide that the old queen is no good any more, they will make a new one. One bee will produce in its life which is around 6 weeks, about one teaspoon of honey. You can harvest up to 500g of pollen from one hive a day. Without bees we would not have over 90 % of our commercial crops – our entire food supply depends on bee pollination.

Links:
- Find your local beekeepers club http://www.honeybee.com.au/beeinfo/assn.html
- DPI Backyard Beekeeping info http://www.dpi.nsw.gov.au/__data/assets/pdf_file/0017/117413/Backyard-beekeeping.pdf
- DPI Queensland hive registration
http://www.daff.qld.gov.au/animal-industries/bees/beekeeping-essentials/hive-registration
- Bee Friendly: A planting guide for European honeybees and Australian native pollinators https://rirdc.infoservices.com.au/items/12-014
- AusBeekeeping Guide 2015 https://www.dropbox.com/s/0lgdqc52m03onnq/AusBeekeepingGuide-2015.pdf?dl=0
- Queen of the sun - A fascinating documentary about bees
https://www.youtube.com/watch?v=frYkQfdQH-w


Mosquito net and rubber gloves - simple protection

Brood frame

Bottom brood box and a super box

Brood box and two Supers

Protection suit, gloves and smoker

Frame with wax foundation

Honeycomb

Honey harvest

Related Posts Plugin for WordPress, Blogger...